
How to Articles
The HPE OfficeConnect Solution requires you to connect your HPE OfficeConnect OC20 to the network. HPE OfficeConnect OC20 is a dual-radio, IEEE 802.11ac-capable wireless access point. This access point supports 802.11ac and legacy 802.11a, 802.11b, 802.11g, and 802.11n wireless devices.
To provision your network, follow these steps:
| 1. | Connect HPE OfficeConnect OC20 to your network. |
| 2. | Verify the LED indicators. If the AP is successfully connected to your provisioning network, the LED indicator turns green. |
LED pattern | Conditions | |
LED1 – Off LED2 – Off | No power to the AP from either the Power over Ethernet (PoE) or power supply unit (PSU). | |
LED1 – Blinking Green LED2 – Off | AP is booting. | |
LED 1 – Solid Green LED 2 – Off | AP finished booting, but is not configured yet, and is broadcasting the unconfigured SSID. | |
LED1 – Blinking Red LED2 – Off | AP failed to get an IP address from the network. | |
LED1 – Solid Red LED2 – Off | Boot failure. | |
LED1 – Blinking Green LED2 – Blinking Green (LED1 and LED2 blinking simultaneously) | AP is trying to join a cluster. | |
LED1 – Blinking Green LED2 – Blinking Amber (LED1 and LED2 alternate) | AP or cluster is being configured through the initial setup. It also indicates that the AP locator function is on.
| |
LED1 – Solid Green LED2 – Solid Green | AP joined the cluster and is configured, operational and offering network services. | |
LED1 – Solid Green LED2 – Blinking Amber | AP cannot reach the Internet. | |
LED1 – Blinking Red LED2 – Blinking Amber (LED1 and LED2 alternate) | AP is not authorized to join the cluster. | |
| 3. | If you want to use the mobile app version, download the HPE OfficeConnect Wi-Fi Portal app. |
| 4. | Launch the HPE OfficeConnect Wi-Fi Portal application. |
The following figure illustrates the HPE OfficeConnect OC20 provisioning procedure:
Figure 1 HPE OfficeConnect Wi-Fi Portal Provisioning Example

To revoke your ownership of an HPE OfficeConnect Wi-Fi Portal site, follow these steps:
This option is only available when a secondary administrator account is configured on the HPE OfficeConnect Wi-Fi Portal site.
| 1. | Select from the advanced drop-down menu on the HPE OfficeConnect Wi-Fi Portal header. The page opens. |
| 2. | From the page, click to go to the page. |
| 3. | Under , click . The page opens. |
| 4. | Click to remove your account from the HPE OfficeConnect Wi-Fi Portal site. |
After your account is removed, you are logged out of the site and redirected to the page. A confirmation message is displayed, stating that your account has been revoked successfully. If you manage other HPE OfficeConnect Wi-Fi Portal sites, you can click to access another site.
This option is only available when a secondary administrator account is configured on the HPE OfficeConnect Wi-Fi Portal site.
| 1. | Tap the advanced menu |
| 2. | Select to open the screen. |
| 3. | From the screen, tap to open the screen. |
| 4. | Tap the advanced menu |
| 5. | Tap to remove your account from the HPE OfficeConnect Wi-Fi Portal site. |
After your account is removed, you are logged out of the site and redirected to the page. A confirmation message is displayed, stating that your account has been revoked successfully. If you manage other HPE OfficeConnect Wi-Fi Portal sites, you can click to access another site.
HPE OfficeConnect Wi-Fi Portal allows you to transfer ownership from one administrator account to another. To transfer ownership of an HPE OfficeConnect Wi-Fi Portal site to another administrator account, follow these steps:
| 6. | From the page, click to go to the page. |
| 7. | Under , click . The page opens. |
| 8. | Enter the new email ID under . |
| 9. | (Optional) If you are transferring ownership of the site to a brand new administrator account, the field appears. Enter a password for the new account. |
| 10. | Click to transfer ownership of the site to the new administrator account. |
After your account is removed, you are logged out of the site. A confirmation message is displayed, stating that ownership has been transferred successfully.
| 1. | Tap the advanced menu |
| 2. | Select to open the screen. |
| 3. | From the screen, tap to open the screen. |
| 4. | Tap the advanced menu |
| 5. | Enter the new email ID under . |
| 6. | (Optional) If you are transferring ownership of the site to a brand new administrator account, the field appears. Enter a password for the new account. |
| 7. | Click to transfer ownership of the site to the new administrator account. |
After your account is removed, you are logged out of the site. A confirmation message is displayed, stating that ownership has been transferred successfully.
To create a guest network, follow these steps:
| 1. | In the page, click the green arrow ( |
| 2. | Set the toggle switch to Active ( ) in the Guest Network Details page. ) in the Guest Network Details page. |
| 3. | Enter a |
| 4. | Select if you do not wish to secure the network with a password or if you want to redirect users to your Facebook business page before being able to access the network. |
| 5. | Select if you want the user to enter the secured password to access the network. |
| 6. | Turn on the Wi-Fi broadcast network to connect to the newly created guest network. |
To modify the name of the main network in the HPE OfficeConnect Wi-Fi Portal mobile app, follow these steps:
| 1. | Tap on the HPE OfficeConnect Wi-Fi Portal home screen. The screen opens. |
| 2. | Select the main network from the list. The screen opens. |
| 3. | Enter a new name under . A warning message appears, indicating that changes to the network settings will disconnect all clients currently accessing the network. |
| 4. | Tap to save the new name. |
To configure Facebook Wi-Fi service on the HPE OfficeConnect Wi-Fi Portal mobile app or web application, follow these steps:
| 1. | Click from the HPE OfficeConnect Wi-Fi Portal home page. |
Figure 2 Guest Network Details

| 2. | Select the active Guest Network connections. |
| 3. | Under , select the tab. |
| 4. | Click the information |
| 1. | Click from the HPE OfficeConnect Wi-Fi Portal home page. |
| 2. | Select one of the active Guest Network connections. |
| 3. | Under the page, ensure that the tab is selected for security. |
| 4. | Click the Facebook Wi-Fi toggle switch to turn it on (). |
The Facebook Wi-Fi setting will appear on the screen only when the option is selected.
| 5. | Some additional configuration is required when the option is enabled for the first time. A pop-up box will appear on the page. |
| 6. | Click . The Facebook Wi-Fi ID is generated and stored in the HPE OfficeConnect Wi-Fi Portal site. |
| 7. | A new browser window opens up with a page for the Facebook Wi-Fi configuration. |
To create a network access schedule, follow these steps:
| 1. | Select a guest network from the list. The screen is displayed. |
| 2. | Click . The page opens. |
| 3. | Click the toggle switch to enable the network schedule. |
When the toggle switch is turned on (), the network schedule is .
When the toggle switch is turned off ( ), the network schedule is .
| 4. | Under , select the day(s) during which the network will be active. |
| 5. | Under , select one of the following options to set a time range during which the network will be active: |
: The network is active throughout the day.
: The network is only active between the designated and .
Web content not appropriate for the workplace? Or online gaming and video streaming taking up too much bandwidth? Control the types of applications and websites that can be accessed on your network through the page or page in the HPE OfficeConnect Wi-Fi Portal application.
To restrict or allow certain types of applications and websites on your network, follow these steps:
| 1. | Click on the HPE OfficeConnect Wi-Fi Portal home page. The page opens. |
| 2. | Select an application category from the list. The page for the selected application category opens. |
| 3. | Under , click the network toggle switch(es) to restrict or allow application access for the selected network(s). |
When the network toggle switch is turned off (), the application category is restricted on the network.
When the network toggle switch is turned on (), the application category is allowed on the network.
To restrict or allow certain types of applications and websites on your network, follow these steps:
| 1. | Click on the HPE OfficeConnect Wi-Fi Portal home page. The page opens. |
| 2. | Select a network from the list. The page or page opens. |
In the HPE OfficeConnect Wi-Fi Portal web application, click the tab.
In the HPE OfficeConnect Wi-Fi Portal mobile app, click . The page opens.
| 3. | Click the application category toggle switch(es) to restrict or allow access to the selected application(s) (). |
When the application category toggle switch is turned off (), the application category is restricted on the network.
When the application category toggle switch is turned on (), the application category is allowed on the network.
The page provides additional information about the clients in your network.
To view the page for a specific client, follow these steps:
| 1. | Click on the HPE OfficeConnect Wi-Fi Portal home page. The page opens. |
| 2. | Select a client from the list. The page for the selected client opens. |
See Viewing details of active clients for more details on the information that is available on the page.
You can view the application usage information for a specific client in your network by selecting a client from the list. See Viewing application information for details on the type of application usage information that is displayed.
To view application information for a specific client in the HPE OfficeConnect Wi-Fi Portal web application, follow these steps:
| 1. | Click on the HPE OfficeConnect Wi-Fi Portal home page. The page opens. |
| 2. | Select a client from the list to open the page. The chart for the selected client is displayed directly on the page. |
To view application information for a specific client in the HPE OfficeConnect Wi-Fi Portal mobile app, follow these steps:
| 1. | Tap on the HPE OfficeConnect Wi-Fi Portal home screen. The screen opens. |
| 2. | Select a client from the list to open the screen. |
| 3. | Tap the donut chart preceding to open the chart for the selected client. |
When an AP is deployed into the network, it joins an HPE OfficeConnect Wi-Fi Portal site, which is a group of APs that are configured and managed from a single location. Upon joining the site, the AP automatically syncs its HPE OfficeConnect Wi-Fi Portal software image with the software image version configured on the site. Each time the software image is updated on the site, all APs in the site are upgraded to the new software image version.
HPE OfficeConnect Wi-Fi Portal sites perform automatic image checks on the HPE OfficeConnect Wi-Fi Portal image server every day at midnight (local time). If a new version of the software image is detected on the image server, the HPE OfficeConnect Wi-Fi Portal automatically downloads and saves the software image to your system so that it is readily available whenever you decide to upgrade your firmware. When a new firmware is available, an notification appears on the HPE OfficeConnect Wi-Fi Portal home page and the page. If your network loses connectivity and fails to perform an image check, the site will resume its daily image checks after the network comes back up.
Before you begin, make sure the alert is enabled on your device so that you are always notified when a new version of the HPE OfficeConnect Wi-Fi Portal software image is available.
To update to the latest version of the HPE OfficeConnect Wi-Fi Portal software image, follow these steps:
| 1. | Open the notification from the HPE OfficeConnect Wi-Fi Portal home page or the page. The alert details page opens. |
Figure 3 ‘New Software is Available’ Alert in the Mobile App

To enable or disable alerts for registered mobile devices, follow these steps :
| 1. | Click the |
| 2. | Click the icon located at the extreme right of the Alert title bar. The four available alert types are displayed and enabled by default. |
| 3. | Move the slider to the left if you wish to disable an alert or move the slider to the right against the alert you wish to enable. |
The  )
)
To view the Alert history, follow these steps:
| 1. | Click the module on the HPE OfficeConnect Wi-Fi Portal home page. |
| 2. | On the System Health main page, you will see the details of the latest alert. Click the . The page is displayed which lists all the alerts received by the app, including the active alerts and the ones that have been cleared. |
| 3. | Click the alert you want to acknowledge. The page is displayed. |
When there are multiple active alerts received by the application, the summary box in the page displays the active alerts with the highest severity in the system along with their color codes. For example: Major active alert takes the highest priority and is displayed in a red summary box.
To acknowledge the alerts, follow these steps:
| 1. | Click the summary box. |
| 2. | The page displays a list of active alerts in descending order of the alert severity and the order by which they should be acknowledged. |
| 3. | Click the alert to view the page. Follow the recommended actions to clear the alert. |
The page provides instructions on how to extend your network by adding more devices.
To extend your network, follow these steps:
| 1. | Click the tile on the HPE OfficeConnect Wi-Fi Portal home page or click > . |
| 2. | Click on the ( ) icon on the title bar of the page. The page is displayed. ) icon on the title bar of the page. The page is displayed. |
| 3. | Connect one or more HPE OfficeConnect devices to the same switch as the other devices. |
| 4. | Power on the HPE OfficeConnect devices. |
| 5. | Wait for the LED lights on the HPE OfficeConnect devices to turn solid green. |
On the , a rectangular bar appears below the when an alert is triggered. The color of the rectangular alert bar will appear according to the alert type. In this case, a major alert has been raised for this device.
Click . You will be directed to the page which provides more information about the unusual activity.
The menu does not appear on the title bar when the status is down.
Figure 4 Access Point Details

To remove the access point from the inventory, follow these steps:
| 1. | If the HPE OfficeConnect Wi-Fi Portal device is removed from the network, you can choose to remove the device from the inventory by clicking in the page. A pop-up box appears on the screen requesting your confirmation. |
| 2. | Click to delete the device from the inventory. |
| 3. | click |
To view the Switch Details, follow these steps:
| 1. | Click > . The page is displayed. |
| 2. | Click on any of the switches listed in the Inventory. The page is displayed. |
On the page, a rectangular bar appears below the Switch when an alert is triggered.
To remove the switch from the inventory, follow these steps:
| 1. | The color of the rectangular alert bar will appear according to the alert type. In this case, a major alert has been raised for this device. |
| 2. | Click on . You will be directed to the page which provides more information about the unusual activity. |
| 3. | If the HPE OfficeConnect Wi-Fi Portal device is removed from the network, you can choose to remove the device from the inventory by clicking on the button in the Troubleshoot section. |
| 4. | A pop-up appears on the screen requesting your confirmation. Click to delete the device from the inventory. |
To enable notifications for alerts, follow these steps:
| 1. | Go to the page in the HPE OfficeConnect Wi-Fi Portal application. |
In the HPE OfficeConnect Wi-Fi Portal web application, select from the advanced drop-down menu on the HPE OfficeConnect Wi-Fi Portal header. The page opens. From the page, click to open the page.
In the HPE OfficeConnect Wi-Fi Portal mobile app, tap the advanced menu (![]() ) icon, and then select to open the screen. From the screen, tap to open the screen.
) icon, and then select to open the screen. From the screen, tap to open the screen.
| 2. | There are 2 types of alert notifications. By default, the are enabled and the notifications are disabled. Ensure that the respective toggle switch is set to enabled () for the App notifications and Email, if you wish to receive both notification types. |
—The mobile app sends a notification regarding the alert triggered by the system based on the notification settings in the registered device.
—An email notification regarding the alert is sent to the registered email account of the user.
| 3. | Click the notification toggle switch(es) to enable () or disable () the alerts you want to be notified about. This applies to both App and Email notifications. |
By default, for all four alert types are enabled.
The troubleshooting assistant can be invoked from the page:
| 1. | Navigate to and click . |
| 2. | In the page, review the to clear the alert. |
| 3. | For additional troubleshooting options, click . The page is displayed with the following information: |
| a. | Most typical situations based on the LED patterns. |
| b. | Recommended actions. |
Figure 5 Troubleshooting Assistant Page
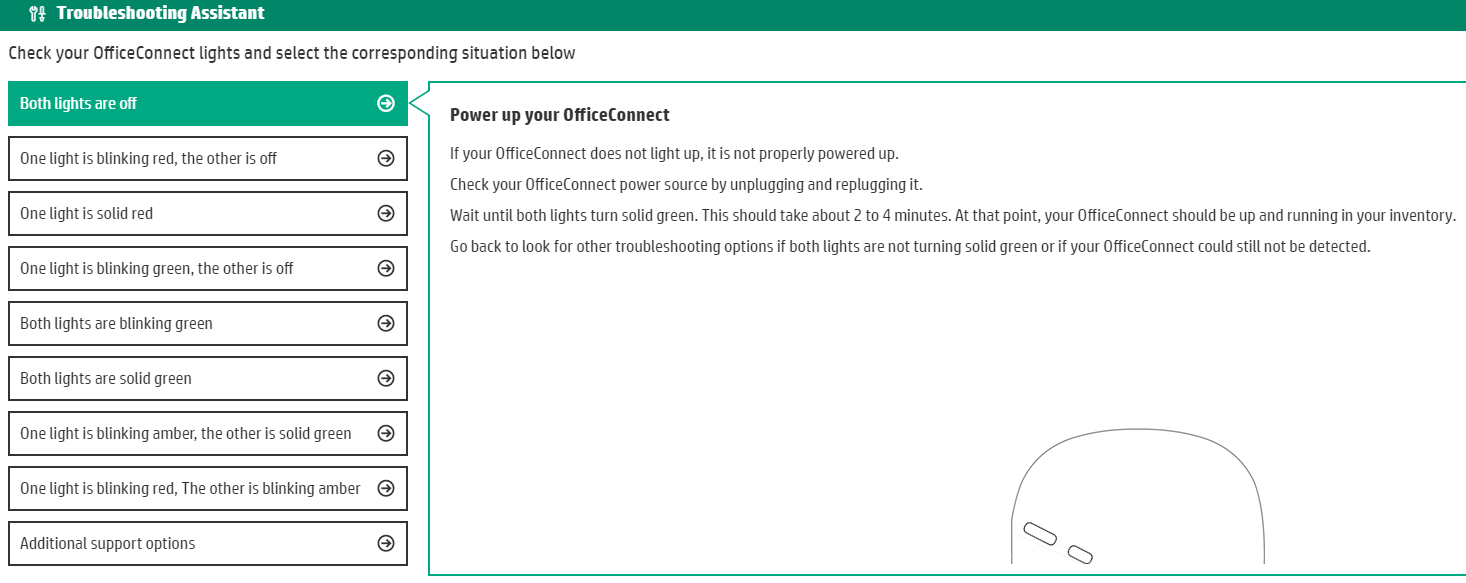
| 4. | Check the status of the LED lights on the HPE OfficeConnect Wi-Fi Portal and click the corresponding solution in the troubleshooting assistant. |
| 5. | If you are unable to find a solution to the problem, click You will be directed to external discussion forums and chat support to assist you better. |
Was this information helpful?
Great! Thanks for the feedback.
Last Updated June 2018 © Copyright 2017 Hewlett Packard Enterprise Development. All Rights Reserved. | Contact |